星期日, 4月 17, 2011

星期六, 4月 09, 2011
Simple Data Visualization Java Program
I know that other programming languages such Processing or Labview can make data visualization fairly easy. However, because I learned Java recently, I want to try to make a program to show the mouse position.
First, we need a frame and a panel to show the graph.


Second, I wrote a function called drawPoint to draw lines. My original thinking is that this function can receive value from external sources. Because if you just want to acquire the mouse position data, we can just get the data and draw in the function. But I didn't.

The function needs an Object Channel argument. This object is to construct an array and an element counter. So, we can add many channels if we want.
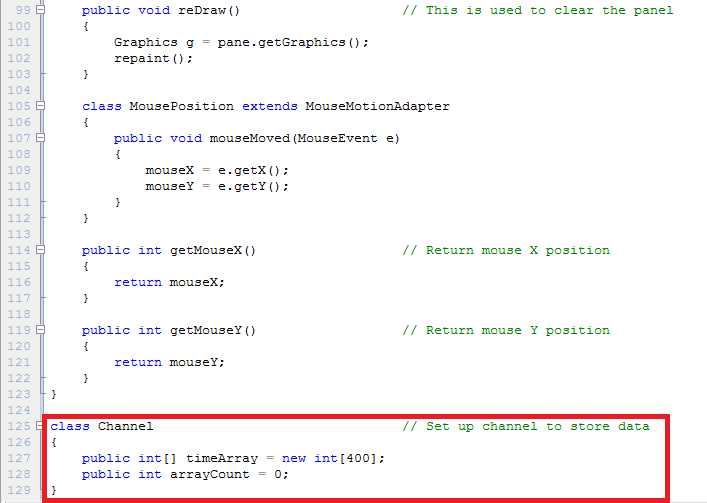
Like I said before, the program originally want to get external data. Now, we just try to acquire mouse position, so I need to return the position to the main class.

In the main class, we need to (1) construct a frame, (2) set up channels, and (3) draw the graphs. Pretty easy, right!!
星期日, 2月 20, 2011
LG gt540 Blue error handler rescue --> success
Last night, I tried to upgrade my LG gt540 to android 2.2 and it worked. However, there is a little problem about the wifi, so I decided to reflash the ROM. Unfortunately, it showed the message of blue error handler. Even I tried another ROM, sometimes it would stuck in the opening screen keeping show "ANDROID". But now I solved the problem. Here is my solution.
1. Download the B2CAppSetup from LG website. (We need this program to install the drivers of LG gt540)
2. You have to prepare the KDZ_FW_UPD_EN program to flash the ROM. You can download from here.
3. Prepare ROM: I have tried many, finally the v20a_00france.kdz was successfully flashed. You can download from here.
4. Then use KDZ_FW_UPD_EN to flash the ROM. You have to let your phone enter the download mode (volume down + Power)
5. After flashing the ROM, the phone may stuck in showing "ANDROID". If so, then use KDZ_FW_UPD_EN flash the V20D_00FB.kdz again, because later we need to use fastboot.
6. After flashing V20D_00FB.kdz, your phone may still stuck in showing "ANDROID". Then shut it down and hold the camera button then plug the USB to let you phone into the fastboot mode. Then you can follow the instruction of upgrading LG gt540 to android 2.2.
1. Download the B2CAppSetup from LG website. (We need this program to install the drivers of LG gt540)
2. You have to prepare the KDZ_FW_UPD_EN program to flash the ROM. You can download from here.
3. Prepare ROM: I have tried many, finally the v20a_00france.kdz was successfully flashed. You can download from here.
4. Then use KDZ_FW_UPD_EN to flash the ROM. You have to let your phone enter the download mode (volume down + Power)
5. After flashing the ROM, the phone may stuck in showing "ANDROID". If so, then use KDZ_FW_UPD_EN flash the V20D_00FB.kdz again, because later we need to use fastboot.
6. After flashing V20D_00FB.kdz, your phone may still stuck in showing "ANDROID". Then shut it down and hold the camera button then plug the USB to let you phone into the fastboot mode. Then you can follow the instruction of upgrading LG gt540 to android 2.2.
星期五, 9月 17, 2010

星期日, 8月 08, 2010
EMG Signals Drive Servo
This simple project is what I really want to do before. I used Biopac system to amplify my EMG signals and acquired these signals by NI USB-6009.
##CONTINUE##
Originally, I want to use serial communication to send the control signals to arduino, but I don't know how to send the unsigned long integer in labview instead of string. As the result of that, I used USB-6009 to generate analog output to arduino.

Every hardware thing is ready, next is to write the program. As I mentioned before, I used labview to acquire EMG signals, so I just acquired the signals, calculated by RMS, and transformed the number into the range 0-5 to have the USB-6009 generate analog output voltage between 0 and 5.

The arduino program is also very simple. It just uses analogInput to receive the voltage from USB-6009 and controls the servo by the voltage value.

However, as you can see, the control is not good. I think this is the key point that I need to establish a good control strategy in the future.
星期六, 7月 03, 2010
Arduino + Processing
I made it to control my robotic arm originally. However, it's bad looking, so I used wii nunckuk instead.
##CONTINUE##
Yesterday, I was thinking how I can do to simply model hand motion and display in computer screen. I am not good at 3D painting, so I used RGB cube that I saw some people used it to demonstrate some programs. You can also find the processing code from the above link.

In this simple project, I used two potentiometers to control two axises. I am sorry that I don't have any idea to use the flex sensor, but I pasted it before, so I did not take it out.

Here is the code in arduino board:
int val_1;  //flex sensor
int val_2;  //middle potentiometer
int val_3;  //bottom potentiometer

void setup()
{
  Serial.begin(9600);
}

void loop()
{
  val_1=analogRead(0);
  val_2=analogRead(1);
  val_3=analogRead(2);

  val_2=map(val_2,340,1023,0,360);
  val_3=map(val_3,0,1023,640,0);

  To2bytes(val_2);
  To2bytes(val_3);

  /*
  Serial.print(val_1);
  Serial.print("\t");
  Serial.print(val_2);
  Serial.print("\t");
  Serial.println(val_3);
  */
  delay(200);
}

void To2bytes(unsigned int inX){
  byte H_Byte;
  byte L_Byte;
 // int a=B01111111
  H_Byte=inX>>8;
  L_Byte=(inX%256);
  Serial.print(H_Byte,BYTE);
  Serial.print(L_Byte,BYTE);
}
And I only add some codes in RGB cube code.
In void setup
println(Serial.list());// List all the available serial ports
  myPort = new Serial(this, Serial.list()[1], 9600);

  //You have to import serial class before.
  //import processing.serial.*;
  //Serial myPort;  // The serial port
In void draw()
int[] inByte = new int[4];
  while (myPort.available() == 4) {
    inByte[0]= myPort.read();
    inByte[1]= myPort.read();
    inByte[2]= myPort.read();
    inByte[3]= myPort.read();
    inY=(inByte[0]<<8)+inByte[1];
    inX=(inByte[2]<<8)+inByte[3];
     print("X" +inX);
     print("\t");
     println("Y" +inY);
  }
星期一, 4月 26, 2010
New robotic arm controlled by wii nunchuk
Continue by the Robotic arm controlled by wii nunchuk. I changed the material corrugated to acrylic, so it must be more consolidated. Also, I saw some videos on the youtube about grippers and tried to design my Robot Gripper.
星期六, 4月 10, 2010
Simple codes to build a pyramid
Someone asked me how to write a program to build "*" pyramid when reading this article. However, I didn't learn java since that time, so I wrote some simple codes in C language. The concept is very simple because it can be done by using nest loop.
##CONTINUE##
Here is the code to build "*" pyramid.

You can also arrange the "*" on the left side.

##CONTINUE##
Here is the code to build "*" pyramid.
#includeint main() { int i,j; for (j=1; j<=5; j++) { for (i=1; i<=5; i++) { if (i<5-j+1) { printf(" "); } else { printf("* "); } } printf("\n"); } return 0; }

You can also arrange the "*" on the left side.
#includeint main() { int i,j; for (j=1; j<=10; j++) { for (i=1; i<=10; i++) { if (i<10-j+1) { printf(" "); } else { printf("* "); } } printf("\n"); } return 0; }

星期四, 3月 25, 2010
Test for syntax highlight by programming a simple sort function program in C language
Actually, I wanted to set the syntax highlight before, but I don't know why I didn't set it until now. You can find how to set the syntax highlight from here.
##CONTINUE##
##CONTINUE##
#includeint main() { int num[5]; int i,j,temp; printf("請輸入五個整數:\n"); for (i=0;i<5;i++) { printf("第%d個數字:",i+1); scanf("%d", &num[i]); } printf("您所輸入的數字為:\n"); for (i=0;i<5;i++) { printf("%d ",num[i]); } // begin to sort data for (i=0;i<5;i++) { for (j=0;j<4;j++) { if (num[j] > num[j+1]) { temp=num[j]; num[j]=num[j+1]; num[j+1]=temp; } } } printf("\n由大到小排序為:\n"); for (i=0;i<5;i++) { printf("%d ",num[i]); } printf("\n"); return 0; }
星期五, 3月 05, 2010
Robotic arm controlled by wii nunchuk
Recently, I was doing my robotic arm by using corrugated because I did not receieve any education of mechanism and I do not have other materials such as plastic, acrylic or stainless to build it.
##CONTINUE##
My girlfriend, Jean, helped me redesigning and improving some structures, so now it is more solid than before.( The movie I posted yesterday. See What the hell is this??!!)
The code of wii nunchuk I used from here. I think it is easy to find the code of wii nunchuk from some smart guys. A guy drawed this picture about the pins of wii motion plus and it is the same with wii nunchuk. I added some commands to control servo.
| 1 2 3 |
| |
| 6 5 4 |
|_-----_|
1 - green - data
2 - nothing
3 - red - 3.3+v
4 - yellow - clock
5 - nothing
6 - white - ground
By the way, this time I asked my girlfriend to demonstate this movie because my hand hairs are so many that once time my mother asked me why my hand is so dirty without wearing her glasses. = =""
##CONTINUE##
My girlfriend, Jean, helped me redesigning and improving some structures, so now it is more solid than before.( The movie I posted yesterday. See What the hell is this??!!)
The code of wii nunchuk I used from here. I think it is easy to find the code of wii nunchuk from some smart guys. A guy drawed this picture about the pins of wii motion plus and it is the same with wii nunchuk. I added some commands to control servo.
| 1 2 3 |
| |
| 6 5 4 |
|_-----_|
1 - green - data
2 - nothing
3 - red - 3.3+v
4 - yellow - clock
5 - nothing
6 - white - ground
By the way, this time I asked my girlfriend to demonstate this movie because my hand hairs are so many that once time my mother asked me why my hand is so dirty without wearing her glasses. = =""
星期四, 3月 04, 2010
I am a pseudo-environmentalist
My product I bought from internet auction comes today. It's a solar board which can charge some ordinary devices like cellular phone or camera.
##CONTINUE##
I bought it just because it's funny and cheap. Maybe I can apply it in my arduino project!!


##CONTINUE##
I bought it just because it's funny and cheap. Maybe I can apply it in my arduino project!!


You can see the light is on when I put the solar board in the place with sun light.
What the hell is this??!!
Is there anyone who can tell what is it?? If you can, you must be a very smart guy or you must know me very well.
##CONTINUE##
I wanted to build a robotic arm in the beginning. But now it looks a little bit like the dinosaur which can move automatically in the museum. = =''
##CONTINUE##
I wanted to build a robotic arm in the beginning. But now it looks a little bit like the dinosaur which can move automatically in the museum. = =''
星期三, 3月 03, 2010
Wii motion plus + Arduino
My wii nunchuk adapter comes today, I can wait testing it in wii motion plus. (Not nunchuk)Here is the movie. (I know the resolution is worst!!)
##CONTINUE##
I have to great thank the amazing guy who decodes the wii motion plus and I use the code in arduino directly. Here is his blog: http://randomhacksofboredom.blogspot.com/2009/06/wii-motion-plus-arduino-love.html. What I only need to do is to connect the wires between the wii adapter and arduino.


##CONTINUE##
I have to great thank the amazing guy who decodes the wii motion plus and I use the code in arduino directly. Here is his blog: http://randomhacksofboredom.blogspot.com/2009/06/wii-motion-plus-arduino-love.html. What I only need to do is to connect the wires between the wii adapter and arduino.


星期一, 2月 15, 2010
An Electrogoniometer Controls a Servo Motor
I think that it is my final project(or called game) before my TOEFL test. The concept is very simple. The arduino reads the voltage of an electrogoniometer and sends the analog signals to servo. However, the voltage of the electrogoniometer is unstable, so you can see the servo motor is shaking. No wander when I used the electrogoniometer for my research, I needed to smooth the data.
星期五, 2月 12, 2010
ES triggered by muscle activation
Today, I tried to establish a system which can detect muscle activities and then trigger an electrical stimulation to help muscle contraction. One reason that I did this project is learning to control DAQ card by labview. The other is that I saw some functional electrical stimulation applications and tried to build a proto type system by myself.
##CONTINUE##

1. The DS7 Digitimer is the electrical stimulation, here is the information: http://www.digitimer.com/pdf/digitimes/Digitimes%202009.pdf
2. The Electrogoniometer is to measure my elbow angle.
3. NI USB 6009 is a data acquisition card which can acquire analog inputs and send digital outputs.
4. The Logitech Webcam is used to record videos.
5. The BNC line is used to connect the trigger of DS7 Digitimer.

The concept of my program is pretty simple. When detecting muscle activation which is over a certain level, the DAQ card sends one digital signal to DS7 digitimer which stimulates muscle.
There is a problem that I do not have any amplifier to record the EMG. I use the sound card of my computer because a sound card is also a kind of DAQ card which can amplify sound signals and records them.

Here is my GUI of labview program. You can see I measured the EMG and joint angle. It also record the video. I can change the threshold which means the level of EMG signals need to over the setting level which trigger the ES.

Here is one thing that I should mention that I did not calibrate the voltage of EMG and the time scale. However, you can understand how it works on below movie.
It is a big sacrifice for me because the temperature is quite low today and I was naked when doing the project.
##CONTINUE##

2. The Electrogoniometer is to measure my elbow angle.
3. NI USB 6009 is a data acquisition card which can acquire analog inputs and send digital outputs.
4. The Logitech Webcam is used to record videos.
5. The BNC line is used to connect the trigger of DS7 Digitimer.

There is a problem that I do not have any amplifier to record the EMG. I use the sound card of my computer because a sound card is also a kind of DAQ card which can amplify sound signals and records them.


Here is one thing that I should mention that I did not calibrate the voltage of EMG and the time scale. However, you can understand how it works on below movie.
It is a big sacrifice for me because the temperature is quite low today and I was naked when doing the project.
星期六, 2月 06, 2010
Control a Servo by a Mouse via python and arduino
After I watched this interesting movie, I tried to do it by using python. However, I am a novel of python and arduino, so I spent lots of time to find the reference.
In python, I need:
1. win32gui module: to get the mouse position
2. pySerial module: to send the data to arduino
##CONTINUE##
Here is my python code
And my code in arduino
In python, I need:
1. win32gui module: to get the mouse position
2. pySerial module: to send the data to arduino
##CONTINUE##
Here is my python code
import win32gui

import time

import serial


ser = serial.Serial(4)


while (True):

x,y = win32gui.GetCursorPos()

time.sleep(0.2)

pos=int(179*x/1599)

ser.write(chr(pos))

print x,y
And my code in arduino
#include


Servo myservo;

int val;


void setup(){

myservo.attach(9);

Serial.begin(9600);

}


void loop(){

if(Serial.available()){

val=Serial.read();

myservo.write(val);

delay(15);

}

}
星期四, 1月 21, 2010
My New Toy

星期四, 1月 14, 2010
Get the signal when pressing mouse left key

A Few weeks ago, I had a project which I need to synchronize two data acquisition system. One is recording force, the other is EMG data. Originally, I hope the force acquisition system can send the analog output to the EMG system, so I can record both data on EMG system. However, the force recording system is too difficult to send the analog output because the manufacture close all the lines in the box.
##CONTINUE##

 However, I know nothing about printed circuit board. I relied on the spirit of try and error to find the two position which can generate 5 voltage when pressing the mouse left key and then wield it.
星期四, 12月 10, 2009
Is CPU with high temperature??!!
 Recently, my notebook always shuts down when pressing power. Even the system does not enter bios, the computer shuts down automatically. I tried to find some information today, and one possibility is the self-protection mechanism of CPU.
 ##CONTINUE##
 So, I tried to dismantle the fan and turn on my computer. Then, I found out that the temperature of CPU is so hot and my computer shut down immediately. I observed the fan carefully and found out that there is a big dirty .... cotton??(I don't know how to call it.) You can see in the picture. I know it's very disgusting. However, the problem still exists after I clean the fan.... but the times which the computer shuts down when turning on are less than before and the system seems quicker and more stable. Maybe I will buy a thermal compound and see whether the situation gets better or not.
星期三, 12月 02, 2009
茅場町GRE之戰
這次花大錢來日本機考(順便觀光?!),終於有點收穫了,這次總共報名了11/30和12/2號兩場考試,本來想說如果第一天考到500以上,第二天就取消不考,不過事實證明,第一天果來是去模擬考!
##CONTINUE##
話說PP3真的是歡樂光碟,我考試前做了一回verbal有620,但是我知道,那些題目沒有什麼鑑別度,因為都被背到爛了!這兩天考試的成績分別為
11/30:V 450 Q 800
12/02:V 550 Q 760(第二次V都沒有好好驗算,就直接按確定)
前面十題真的很重要,填充題不要怕,我第二天考第一題就是填充題,不過說真的,看電腦螢幕上面的題目跟直接在書上看截然不同,其實我在寫PP3的時候就有感覺,那時候原本想把PP3裡面的填充好好練習,不過無奈偷懶沒有去看,第一天考試看到填充真的是心煩意亂,無法靜下心來思考,所以真的建議機考的人,填充一定要練習在螢幕上看,而且就像老方說的,機考沒辦法作記號,選項常常會不小心又重複看,一定要小心。
第一天考試,說真的第一題就遇到本月的機經題,本以為寫得很順,但是大約第四題左右出現填充題,心煩沒有辦法思考,第六題左右又出現短閱,又開始煩悶結果都用猜的,所以最後成績不是很理想。而我女朋友更慘,他加上今天和PP3練習,第一題全部都是碰到填充題,而且今天第一題居然跟我一模一樣,第一天考試,他簡直完全爆炸,V只有慘不忍睹的360(比去年10G還低),所以昨天我跟他在starbucks苦讀韓國兩年,結果今天成績突飛猛進,一下多了210,比我還高!!
準備方面,約兩個月的時間,雖然去年暑假補過老方,但是10G成績慘不忍睹,V只有370,後來就跑去準備托福,事實證明,不管是GRE或是托福,一次最好認真的準備一樣,不要跳來跳去會浪費很多時間,結果現在托福也還沒破百,準備又要力拼托福。
準備教材,紅寶書加韓國兩年和陳聖元以及老方寄的11月機經,九月底決定要考GRE就按照17天的計畫,每天每天啃,雖然我的計畫不只17天,但是我依舊保持每天兩個新的Lists,然後加上複習,最多的一天有10Lists要念,由於我在當全職研究助理,所以有時候會調整一天一個新的Lists,但複習依舊,每天都要念到晚上12點到一點才唸完,在這裡真的很感謝我的老闆,因為我在決定要在考GRE的時候,把他交待我要分析的資料(10月份的工作),三天全部拼完,然後寫信跟他說我要考試,能否在工作之餘讓我唸書,他也許被我三天就把工作做完嚇到吧,結果居然答應,哈哈!所以每天除了最行政事物,會是突然有資料需要分析,剩下的時間,我全部拿來唸書。所以認真的在10/18號把紅寶書用17天的方法背完一次,但是依舊有很多字背得不熟,但是這個時候卻進入的唸書倦怠期,也許是之前唸得太拼,結果整整三個禮拜唸書有一搭沒一搭,三個禮拜才又複習一次,結果把原本要念舊CAT的計畫全部打亂,在此建議,CAT有時間就要早點念,結果我反義類比大概都只唸了四分之一,然後我又是個完美主義者,不把紅寶書全部背熟,心裡就覺得怪怪的,所以一直在背紅寶書,直到考試前三天才開始念韓國兩年,結果紅寶書被不起來的字還是背不起來(自認只背好八成)。
韓國兩年真的不錯,強烈建議早點念,我女朋友跟我一樣拖拖拖,拖到第一天考爆,然後昨天我跟他在starbucks苦讀的時候他才把韓國兩年的反義K完,結果今天考得比我還高!話說我自認為紅寶背得比他還熟。
填充的話,就像剛剛所說得,一定要在電腦螢幕上練習過,不然真的會心浮氣躁,今天比前天進步的主要原因,我想也是因為比較適應,也比較能靜下心來看題目,陳聖元的話,話說我真的很不認真,去年機考做到27,28回,這次大概做到45回,不過這次在練習的時候,大概是紅寶書單字背比較多了,題目看不懂的單字變少,剩下真的就是在解邏輯概念(還好還記得老方教得),所以後來練習大多是在6,7題的地方出錯,前五題至少都可以把握住。
最後就是機考前十題真的很重要,一定要好好做,我一開始真的沒有很體認這個重要概念,第一天考得時候只想得要把題目做完,但是第二天真的是認真解,前十題我想我應該只有第九題不確定可能答錯,其他應該都還好,我11題出現短閱,眼看時間已經花了16分鐘,所以又開始心浮氣躁,看了文章雖然不難,但是卻選不出來,結果又開始猜,然後16題開始,長閱短閱連發,真的是,原本想說不想要連錯,但是又因為時間不夠,又開始全猜,後面的類反也因為時間不多就比較沒有時間好好思考,好在最後還是有500。而我女朋友也是,被我這麼一講(其實我是跟他說我第一天數學算很慢很保守,最後三題剩下一分半全部猜,結果還有800),所以他也很注意前十題。
考到這個成績已經很滿意了,最後真的是可以說,馬的!GRE掰掰啦!
##CONTINUE##
話說PP3真的是歡樂光碟,我考試前做了一回verbal有620,但是我知道,那些題目沒有什麼鑑別度,因為都被背到爛了!這兩天考試的成績分別為
11/30:V 450 Q 800
12/02:V 550 Q 760(第二次V都沒有好好驗算,就直接按確定)
前面十題真的很重要,填充題不要怕,我第二天考第一題就是填充題,不過說真的,看電腦螢幕上面的題目跟直接在書上看截然不同,其實我在寫PP3的時候就有感覺,那時候原本想把PP3裡面的填充好好練習,不過無奈偷懶沒有去看,第一天考試看到填充真的是心煩意亂,無法靜下心來思考,所以真的建議機考的人,填充一定要練習在螢幕上看,而且就像老方說的,機考沒辦法作記號,選項常常會不小心又重複看,一定要小心。
第一天考試,說真的第一題就遇到本月的機經題,本以為寫得很順,但是大約第四題左右出現填充題,心煩沒有辦法思考,第六題左右又出現短閱,又開始煩悶結果都用猜的,所以最後成績不是很理想。而我女朋友更慘,他加上今天和PP3練習,第一題全部都是碰到填充題,而且今天第一題居然跟我一模一樣,第一天考試,他簡直完全爆炸,V只有慘不忍睹的360(比去年10G還低),所以昨天我跟他在starbucks苦讀韓國兩年,結果今天成績突飛猛進,一下多了210,比我還高!!
準備方面,約兩個月的時間,雖然去年暑假補過老方,但是10G成績慘不忍睹,V只有370,後來就跑去準備托福,事實證明,不管是GRE或是托福,一次最好認真的準備一樣,不要跳來跳去會浪費很多時間,結果現在托福也還沒破百,準備又要力拼托福。
準備教材,紅寶書加韓國兩年和陳聖元以及老方寄的11月機經,九月底決定要考GRE就按照17天的計畫,每天每天啃,雖然我的計畫不只17天,但是我依舊保持每天兩個新的Lists,然後加上複習,最多的一天有10Lists要念,由於我在當全職研究助理,所以有時候會調整一天一個新的Lists,但複習依舊,每天都要念到晚上12點到一點才唸完,在這裡真的很感謝我的老闆,因為我在決定要在考GRE的時候,把他交待我要分析的資料(10月份的工作),三天全部拼完,然後寫信跟他說我要考試,能否在工作之餘讓我唸書,他也許被我三天就把工作做完嚇到吧,結果居然答應,哈哈!所以每天除了最行政事物,會是突然有資料需要分析,剩下的時間,我全部拿來唸書。所以認真的在10/18號把紅寶書用17天的方法背完一次,但是依舊有很多字背得不熟,但是這個時候卻進入的唸書倦怠期,也許是之前唸得太拼,結果整整三個禮拜唸書有一搭沒一搭,三個禮拜才又複習一次,結果把原本要念舊CAT的計畫全部打亂,在此建議,CAT有時間就要早點念,結果我反義類比大概都只唸了四分之一,然後我又是個完美主義者,不把紅寶書全部背熟,心裡就覺得怪怪的,所以一直在背紅寶書,直到考試前三天才開始念韓國兩年,結果紅寶書被不起來的字還是背不起來(自認只背好八成)。
韓國兩年真的不錯,強烈建議早點念,我女朋友跟我一樣拖拖拖,拖到第一天考爆,然後昨天我跟他在starbucks苦讀的時候他才把韓國兩年的反義K完,結果今天考得比我還高!話說我自認為紅寶背得比他還熟。
填充的話,就像剛剛所說得,一定要在電腦螢幕上練習過,不然真的會心浮氣躁,今天比前天進步的主要原因,我想也是因為比較適應,也比較能靜下心來看題目,陳聖元的話,話說我真的很不認真,去年機考做到27,28回,這次大概做到45回,不過這次在練習的時候,大概是紅寶書單字背比較多了,題目看不懂的單字變少,剩下真的就是在解邏輯概念(還好還記得老方教得),所以後來練習大多是在6,7題的地方出錯,前五題至少都可以把握住。
最後就是機考前十題真的很重要,一定要好好做,我一開始真的沒有很體認這個重要概念,第一天考得時候只想得要把題目做完,但是第二天真的是認真解,前十題我想我應該只有第九題不確定可能答錯,其他應該都還好,我11題出現短閱,眼看時間已經花了16分鐘,所以又開始心浮氣躁,看了文章雖然不難,但是卻選不出來,結果又開始猜,然後16題開始,長閱短閱連發,真的是,原本想說不想要連錯,但是又因為時間不夠,又開始全猜,後面的類反也因為時間不多就比較沒有時間好好思考,好在最後還是有500。而我女朋友也是,被我這麼一講(其實我是跟他說我第一天數學算很慢很保守,最後三題剩下一分半全部猜,結果還有800),所以他也很注意前十題。
考到這個成績已經很滿意了,最後真的是可以說,馬的!GRE掰掰啦!
訂閱:
文章 (Atom)